Dealing with oily skin can feel like an uphill battle. One moment your face looks fresh, the next it’s shiny enough to reflect sunlight. Commercial toners promise to solve this problem, but they often contain harsh chemicals that can strip your skin and trigger even more oil production.
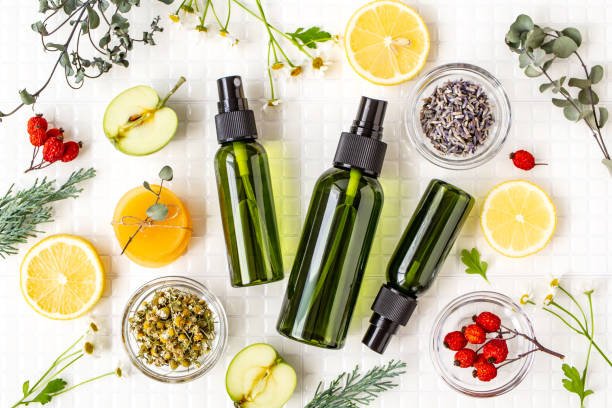
The solution might be sitting right in your kitchen. Best Homemade Toner for Oily Skin offer a gentle, cost-effective way to balance your skin’s natural pH while controlling excess oil. Unlike store-bought products packed with synthetic ingredients, DIY toners let you customize your skincare routine with natural ingredients that work specifically for your skin type.
Creating your own oily skin toner isn’t just about saving money—it’s about taking control of what you put on your face. When you know every ingredient, you can avoid harsh chemicals and allergens while targeting your specific skin concerns. Plus, most homemade toner recipes take less than five minutes to prepare.
Why Your Skin Produces Excess Oil
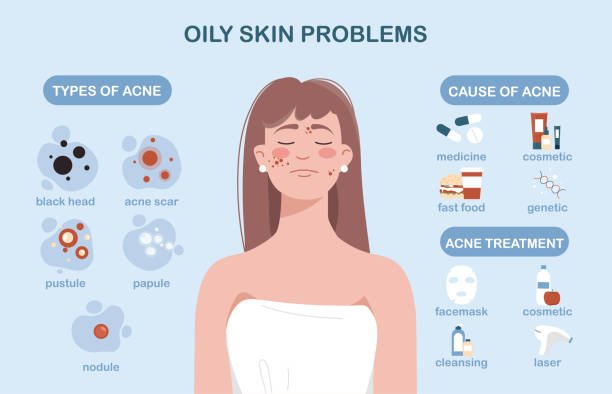
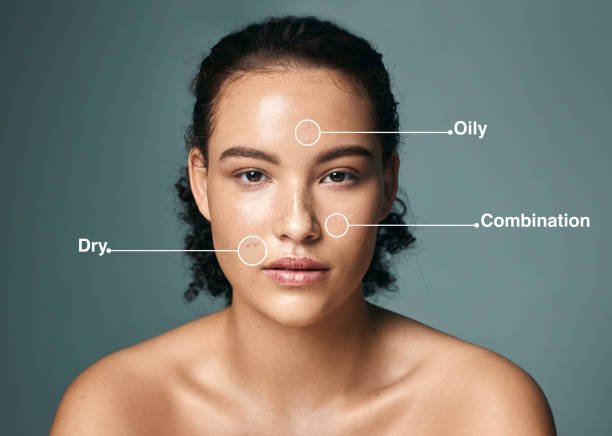
Understanding oily skin helps you choose the right homemade toner recipe. Your sebaceous glands produce sebum, a natural oil that protects and moisturizes your skin. However, several factors can cause these glands to go into overdrive.
Genetics play a major role in determining your skin type. If your parents had oily skin, you’re more likely to experience the same. Hormonal fluctuations, particularly during puberty, menstruation, or pregnancy, can also trigger increased oil production.
Environmental factors contribute too. Hot, humid weather stimulates oil production, while using harsh skincare products can actually backfire. When you strip away too much oil, your skin compensates by producing even more sebum—creating a frustrating cycle.
Oily skin often comes with enlarged pores, blackheads, and a shiny T-zone (forehead, nose, and chin). While this skin type is more prone to acne, it also has benefits: the extra oil provides natural protection and can help prevent premature aging.
Benefits of Using Homemade Toner for Oily Skin
Cost-Effective Natural Skincare
Commercial toners can cost $15-50 per bottle, while homemade versions typically cost under $5 to make. Most DIY toner ingredients are pantry staples you already own, making natural skincare accessible to everyone.
Chemical-Free Formulations
Store-bought toners often contain alcohol, synthetic fragrances, and preservatives that can irritate sensitive skin. Homemade toners use simple, natural ingredients that are gentler on your skin barrier while still being effective.
Customizable for Your Skin’s Needs
Every person’s skin is unique. With homemade toners, you can adjust ingredient ratios based on your skin’s response. Too drying? Add more water. Need extra oil control? Increase the active ingredient concentration.
Fresh Ingredients Every Time
Unlike commercial products that can sit on shelves for months, homemade toners are made fresh. This ensures maximum potency and reduces the risk of using oxidized or degraded ingredients.
3 Essential DIY Toner Recipes
Apple Cider Vinegar Toner
Apple cider vinegar contains natural acids that help balance your skin’s pH while providing gentle exfoliation. This powerhouse ingredient also has antimicrobial properties that can help prevent acne-causing bacteria.
Ingredients:
- 1 part raw, unfiltered apple cider vinegar
- 3 parts filtered water
Instructions:
- Mix apple cider vinegar and water in a clean spray bottle or container
- Shake well before each use
- Apply with a cotton pad or spray directly onto clean skin
- Allow to air dry before applying moisturizer
Precautions: Always dilute apple cider vinegar to prevent irritation. Start with a weaker concentration (1:4 ratio) if you have sensitive skin. Perform a patch test on your inner arm 24 hours before first use. Not recommended for highly sensitive skin types.
Witch Hazel Toner
Witch hazel is a natural astringent that tightens pores and controls excess oil without over-drying. It contains tannins that provide anti-inflammatory benefits, making it ideal for acne-prone skin.
Ingredients:
- 1/2 cup alcohol-free witch hazel
- 1/2 cup filtered water
- Optional: 2-3 drops lavender essential oil
Instructions:
- Combine witch hazel and water in a clean bottle
- Add essential oil if using and shake well
- Apply to clean skin using a cotton pad
- Let dry completely before moisturizing
Precautions: Choose alcohol-free witch hazel to prevent excessive drying. If irritation occurs, discontinue use immediately. Essential oils are optional—skip them if you have sensitive skin.
Green Tea Toner
Green tea is rich in antioxidants and has natural anti-inflammatory properties. The caffeine content helps tighten pores while the polyphenols provide protection against environmental damage.
Ingredients:
- 1 cup strong green tea, cooled
- 1 tablespoon honey (optional)
- 2-3 drops tea tree oil (optional)
Instructions:
- Brew a strong cup of green tea and let cool completely
- Stir in honey if using for added moisturizing benefits
- Add tea tree oil for extra acne-fighting power
- Store in refrigerator and use within 3-5 days
Precautions: Use freshly brewed tea and store in the refrigerator to prevent bacterial growth. Avoid if allergic to caffeine or tea. The cooling sensation makes this especially refreshing for irritated skin.
Gentle Recipe Variations for Different Skin Needs
Soothing Aloe Vera and Rosewater Toner
Perfect for sensitive or combination skin that needs oil control without irritation.
Recipe: Mix equal parts pure aloe vera gel and rosewater. This gentle combination hydrates while providing mild astringent properties.
Brightening Lemon and Cucumber Toner
Fresh cucumber juice mixed with a few drops of lemon juice creates a refreshing toner that helps brighten skin tone.
Important: Use only at night due to lemon’s photosensitizing effects. Always apply sunscreen the following day.
Antibacterial Tea Tree Oil Toner
Add 2-3 drops of tea tree oil to your witch hazel toner for enhanced acne-fighting properties. Use sparingly to avoid over-drying.
Application Tips for Maximum Results
Timing Matters
Apply toner after cleansing but before serums and moisturizers. This allows the active ingredients to penetrate clean skin effectively.
Application Methods
- Cotton pad: Provides gentle physical exfoliation while distributing product evenly
- Spray bottle: Offers a refreshing mist that’s perfect for sensitive skin
- Clean hands: Pat gently onto skin for the most economical application
Frequency Guidelines
Start with once daily, preferably in the evening. Gradually increase to twice daily if your skin tolerates it well. Over-use can lead to irritation and increased oil production.
Follow-Up Care
Always moisturize after toning, even if you have oily skin. Skipping moisturizer signals your skin to produce more oil. Choose a lightweight, oil-free moisturizer that won’t clog pores.
Safety First: Patch Testing and Precautions
Essential Patch Testing
Test any new homemade toner on a small area of your inner arm 24-48 hours before applying to your face. Look for redness, itching, burning, or swelling.
Signs to Stop Using
Discontinue use immediately if you experience persistent redness, increased breakouts, burning sensation, or excessive dryness. Your skin’s reaction is more important than following any recipe exactly.
Special Considerations
- Pregnancy and nursing: Consult your healthcare provider before using essential oils
- Medication interactions: Some topical treatments may interact with acidic toners
- Sun sensitivity: Citrus-based toners can increase photosensitivity
Proper Storage for Homemade Toners
Refrigeration Guidelines
Store fresh ingredient toners (like green tea) in the refrigerator for 3-5 days maximum. The cool temperature provides a refreshing application while preventing bacterial growth.
Room Temperature Storage
Vinegar and witch hazel-based toners can be stored at room temperature for up to one month. Keep them in a cool, dark place away from direct sunlight.
Container Selection
Use dark glass bottles to protect ingredients from light degradation. Ensure all containers are thoroughly cleaned and sterilized before use.
Freshness Indicators
Replace your homemade toner if you notice changes in smell, color, or texture. When in doubt, make a fresh batch—the ingredients are affordable enough to prioritize safety.
Frequently Asked Questions
How often should I use homemade toners
What if my skin gets worse before it gets better?
Do I still need moisturizer after using toner?
How long can homemade toner last?
Which ingredients should I avoid in a homemade toner for oily skin?
Best Homemade Toner for Oily Skin
Creating your own homemade toner puts you in control of your skincare routine. These natural recipes offer effective oil control without the harsh chemicals found in many commercial products. Start with one recipe and adjust the ingredients based on how your skin responds.
Remember that consistency matters more than perfection. Using a gentle, homemade toner regularly will give you better results than switching between harsh commercial products. Take photos to track your progress and don’t be afraid to modify recipes to suit your skin’s unique needs.
Your journey to balanced, healthy skin doesn’t require expensive products or complicated routines. Sometimes the best solutions are the simplest ones, made with ingredients you can pronounce and trust.